找到
12
篇与
搭建
相关的结果
-
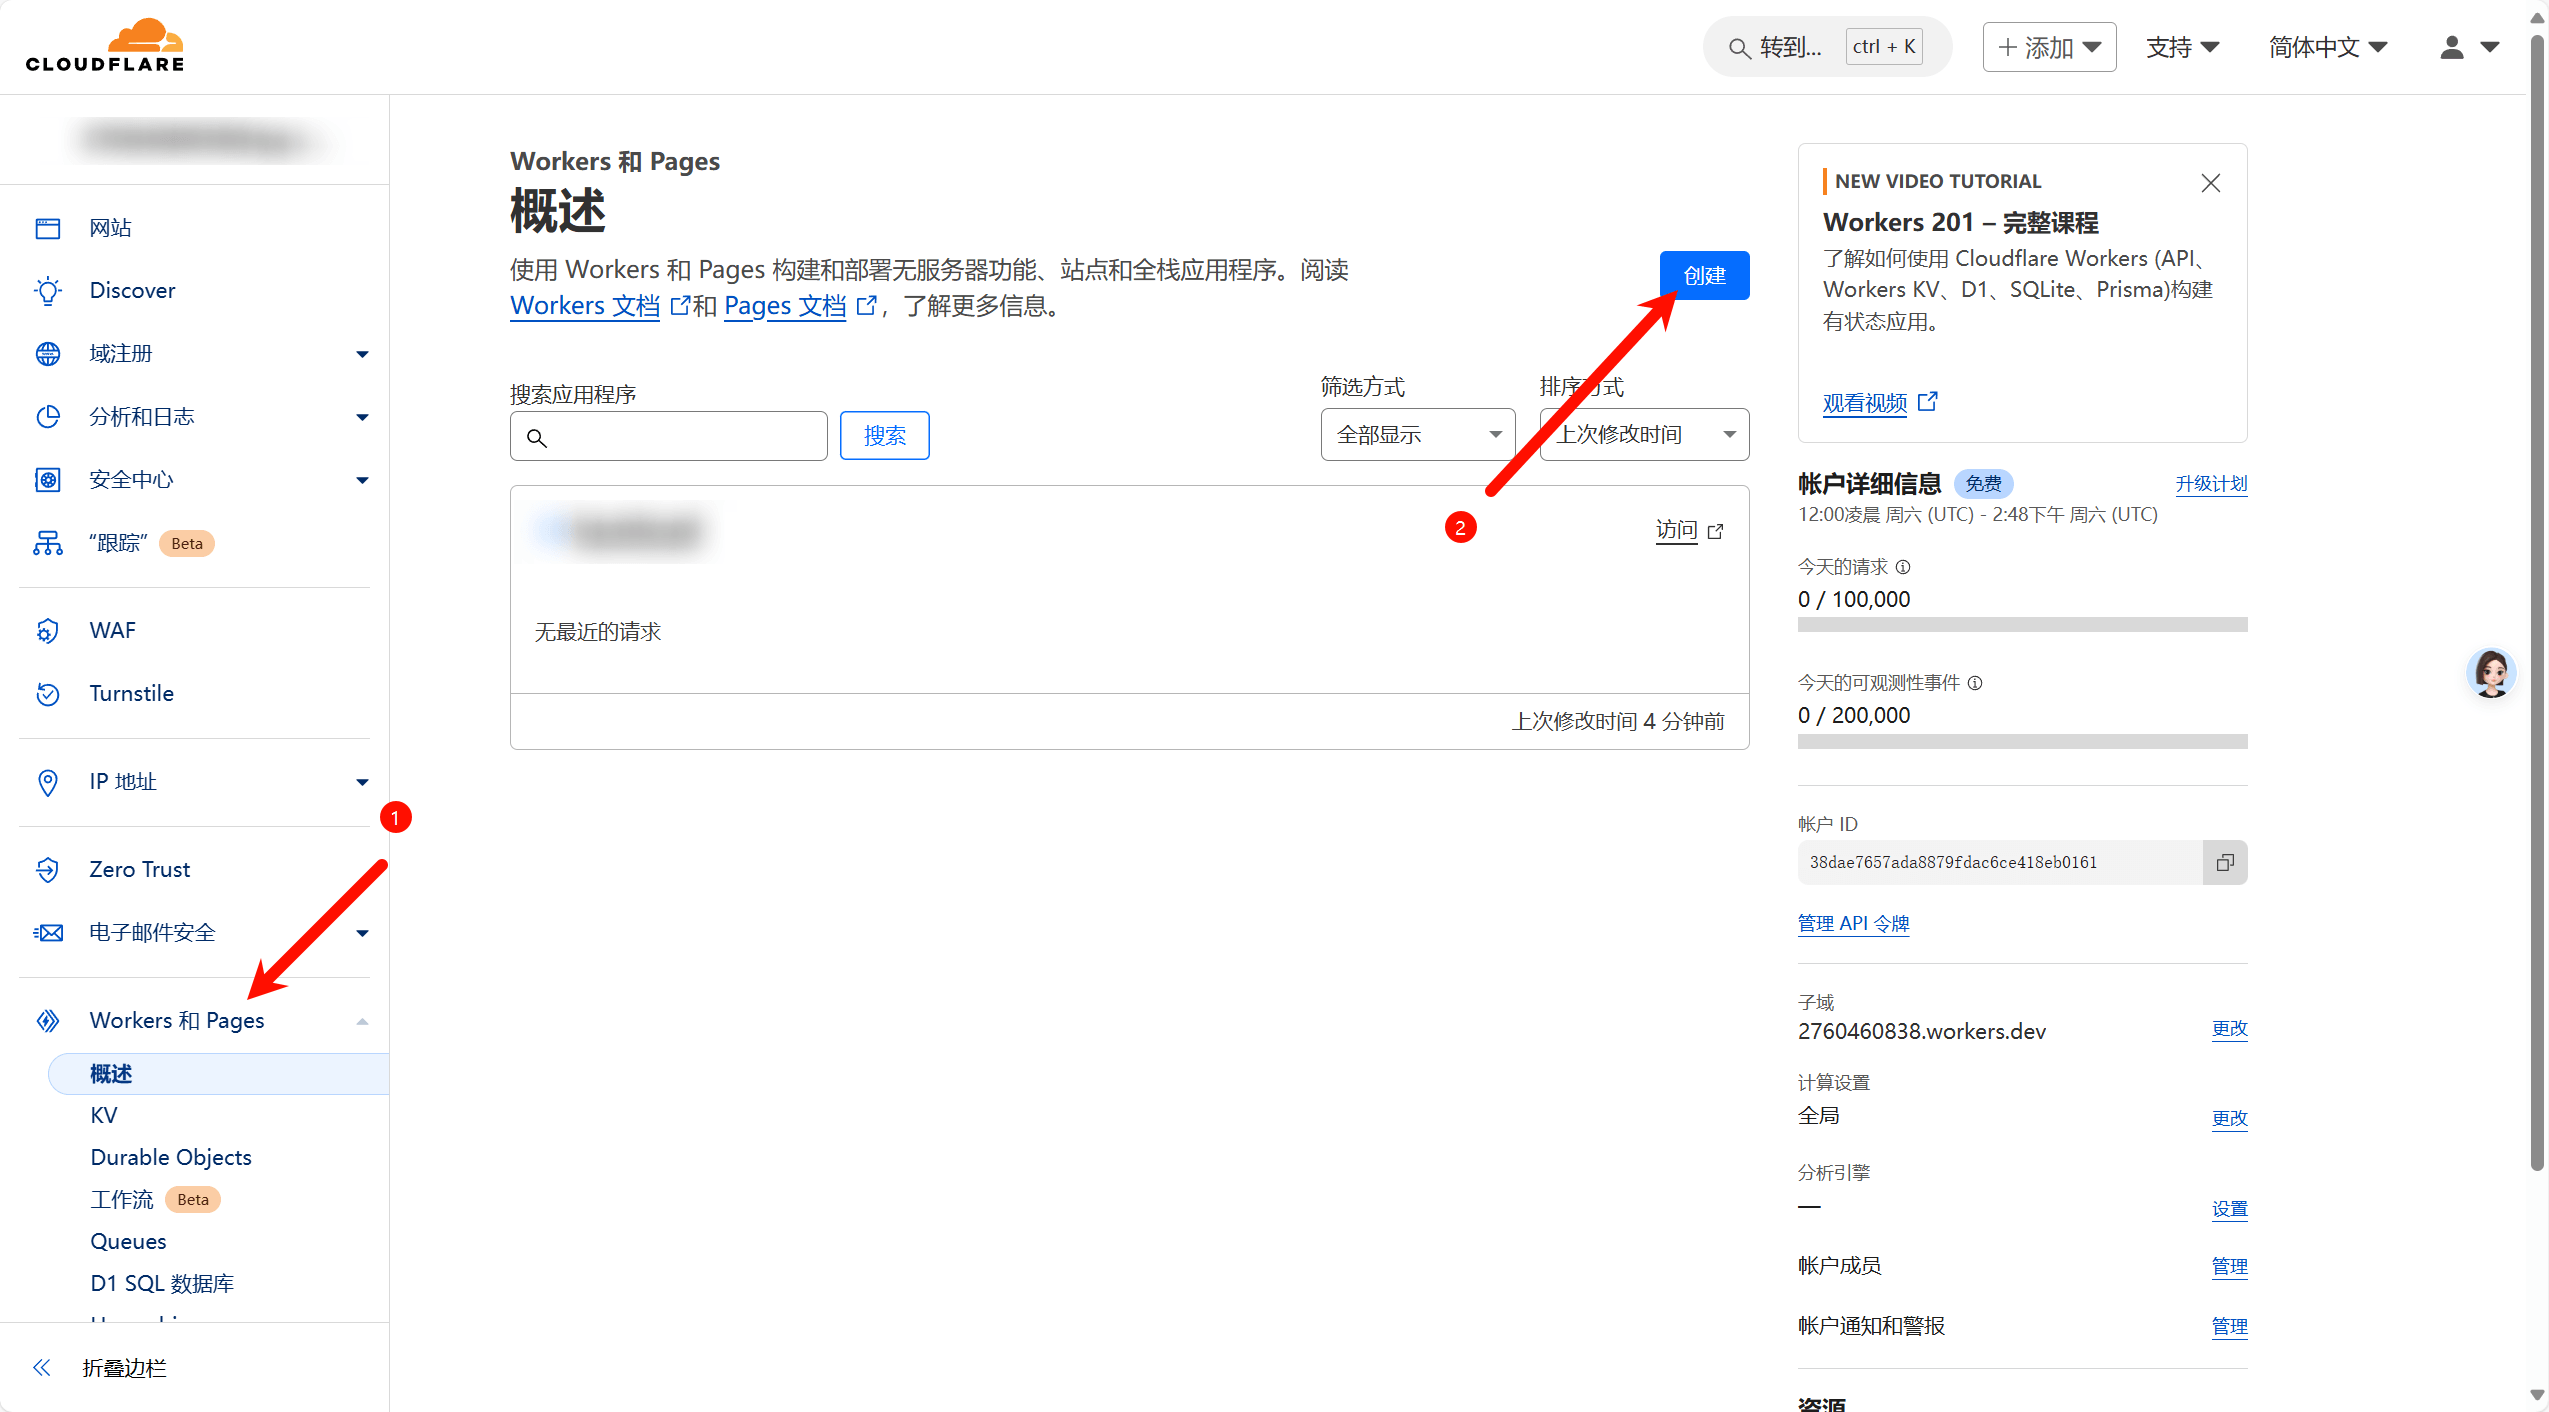
 Cloudflare使用Workers设置反代 Cloudflare使用Workers设置反代 登录与注册 Cloudflare | Web Performance & Security 部署Workers 登录进去后点击【Workers和 Pages】,然后点击【创建】 点击【创建Workers】 然后先设置一下域名,然后点击【部署】 然后就可以配置反代代码了,有两种反代代码,自行选择。 反代代码1 // 代理网站 const upstream = 'xxx-my.sharepoint.com' // 代理网站的目录 const upstream_path = '/' // 手机用户代理网站 const upstream_mobile = 'xxx-my.sharepoint.com' // 屏蔽国家和地区 const blocked_region = ['KP', 'SY', 'PK', 'CU'] // 屏蔽 IP 地址 const blocked_ip_address = ['0.0.0.0', '127.0.0.1'] // 源站是否开启 HTTPS const https = true // 是否允许浏览器缓存 const disable_cache = false // 文本替换 const replace_dict = { '$upstream': '$custom_domain', '//sharepoint.com': '' } // 以下无需修改 addEventListener('fetch', event => { event.respondWith(fetchAndApply(event.request)); }) async function fetchAndApply(request) { const region = request.headers.get('cf-ipcountry').toUpperCase(); const ip_address = request.headers.get('cf-connecting-ip'); const user_agent = request.headers.get('user-agent'); let response = null; let url = new URL(request.url); let url_hostname = url.hostname; if (https == true) { url.protocol = 'https:'; } else { url.protocol = 'http:'; } if (await device_status(user_agent)) { var upstream_domain = upstream; } else { var upstream_domain = upstream_mobile; } url.host = upstream_domain; if (url.pathname == '/') { url.pathname = upstream_path; } else { url.pathname = upstream_path + url.pathname; } if (blocked_region.includes(region)) { response = new Response('Access denied: WorkersProxy is not available in your region yet.', { status: 403 }); } else if (blocked_ip_address.includes(ip_address)) { response = new Response('Access denied: Your IP address is blocked by WorkersProxy.', { status: 403 }); } else { let method = request.method; let request_headers = request.headers; let new_request_headers = new Headers(request_headers); new_request_headers.set('Host', upstream_domain); new_request_headers.set('Referer', url.protocol + '//' + url_hostname); let original_response = await fetch(url.href, { method: method, headers: new_request_headers }) connection_upgrade = new_request_headers.get("Upgrade"); if (connection_upgrade && connection_upgrade.toLowerCase() == "websocket") { return original_response; } let original_response_clone = original_response.clone(); let original_text = null; let response_headers = original_response.headers; let new_response_headers = new Headers(response_headers); let status = original_response.status; if (disable_cache) { new_response_headers.set('Cache-Control', 'no-store'); } new_response_headers.set('access-control-allow-origin', '*'); new_response_headers.set('access-control-allow-credentials', true); new_response_headers.delete('content-security-policy'); new_response_headers.delete('content-security-policy-report-only'); new_response_headers.delete('clear-site-data'); if (new_response_headers.get("x-pjax-url")) { new_response_headers.set("x-pjax-url", response_headers.get("x-pjax-url").replace("//" + upstream_domain, "//" + url_hostname)); } const content_type = new_response_headers.get('content-type'); if (content_type != null && content_type.includes('text/html') && content_type.includes('UTF-8')) { original_text = await replace_response_text(original_response_clone, upstream_domain, url_hostname); } else { original_text = original_response_clone.body } response = new Response(original_text, { status, headers: new_response_headers }) } return response; } async function replace_response_text(response, upstream_domain, host_name) { let text = await response.text() var i, j; for (i in replace_dict) { j = replace_dict[i] if (i == '$upstream') { i = upstream_domain } else if (i == '$custom_domain') { i = host_name } if (j == '$upstream') { j = upstream_domain } else if (j == '$custom_domain') { j = host_name } let re = new RegExp(i, 'g') text = text.replace(re, j); } return text; } async function device_status(user_agent_info) { var agents = ["Android", "iPhone", "SymbianOS", "Windows Phone", "iPad", "iPod"]; var flag = true; for (var v = 0; v < agents.length; v++) { if (user_agent_info.indexOf(agents[v]) > 0) { flag = false; break; } } return flag; } 反代代码2 addEventListener('fetch', event => { event.respondWith(handleRequest(event.request)) }) const specialCases = { "*": { "Origin": "DELETE", "Referer": "DELETE" } } function handleSpecialCases(request) { const url = new URL(request.url); const rules = specialCases[url.hostname] || specialCases["*"]; for (const [key, value] of Object.entries(rules)) { switch (value) { case "KEEP": break; case "DELETE": request.headers.delete(key); break; default: request.headers.set(key, value); break; } } } async function handleRequest(request) { const url = new URL(request.url); if (url.pathname === "/") { return new Response(`<!DOCTYPE html> <html lang="zh-CN"> <head> <meta charset="UTF-8"> <title>转发服务使用指南</title> <style> body { font-family: Arial, sans-serif; margin: 0; padding: 0; background: #f4f4f4; } .container { width: 80%; margin: auto; overflow: hidden; } header { background: #333; color: #fff; padding: 20px; text-align: center; } section { padding: 20px; margin-bottom: 20px; } .example { background: #fff; padding: 20px; border-radius: 4px; } h2 { color: #333; } code { background: #ddd; padding: 2px 6px; border-radius: 4px; display: inline-block; margin: 0 5px; } </style> </head> <body> <header> <h1>转发服务使用指南</h1> </header> <div class="container"> <section> <h2>简介</h2> <p>本服务是一个轻量级的https请求转发代理,可以帮助您绕过某些网络限制,或者在开发过程中模拟https请求。该转发接口基于Cloudflare构建,以提供快速且安全的服务体验。</p> </section> <section> <h2>服务域名</h2> <p>我们提供了多个转发服务域名,您可以根据需要选择合适的服务域名:</p> <ul> <li><strong>通用转发服务:</strong><code>https://lius.me</code></li> <li><strong>Gravatar 转发服务:</strong><code>https://gravatar.lius.me</code></li> <li><strong>GitHub 转发服务:</strong><code>https://github.lius.me</code></li> </ul> </section> <section> <h2>如何使用</h2> <p>使用转发服务非常简单,只需遵循以下步骤:</p> <ol> <li>确定您想要访问的目标URL。</li> <li>根据您的需求选择相应的转发服务域名。</li> <li>在浏览器地址栏输入我们的转发服务URL,并在其后附加目标URL的完整路径。</li> <li>按下回车键,我们的服务将自动将请求转发到目标URL。</li> </ol> </section> <section> <h2>特定域名转发接口</h2> <p>我们为一些常用的服务提供了专门的转发接口,以优化访问速度和体验。</p> <section class="example"> <h3>Gravatar 转发</h3> <p>如果您需要访问Gravatar的头像服务,可以使用以下转发接口:</p> <p><strong>转发服务域名:</strong><code>https://gravatar.lius.me</code></p> <p><strong>示例:</strong>要获取用户<code>someuser</code>的Gravatar头像,访问以下URL:</p> <p><code>https://gravatar.lius.me/avatar/someuser?s=128</code></p> </section> <section class="example"> <h3>GitHub 转发</h3> <p>如果您需要访问GitHub的API或资源,可以使用以下转发接口:</p> <p><strong>转发服务域名:</strong><code>https://github.lius.me</code></p> <p><strong>示例:</strong>要访问用户<code>someuser</code>的GitHub仓库<code>repo</code>,请访问:</p> <p><code>https://github.lius.me/users/someuser/repos/repo</code></p> </section> </section> <section> <h2>通用转发服务</h2> <p>对于不提供专门转发接口的网站,您可以继续使用我们的通用转发服务。</p> <section class="example"> <h3>通用转发示例</h3> <p><strong>转发服务域名:</strong><code>https://lius.me</code></p> <p><strong>示例:</strong>要访问<code>https://example.com/api/data</code>,请使用以下URL:</p> <p><code>https://lius.me/https://example.com/api/data</code></p> </section> </section> <section> <h2>注意事项</h2> <p>在使用转发服务时,请仔细阅读并遵守以下条款:</p> <h3>遵守使用条款</h3> <p>您必须遵守目标网站的使用条款和条件。本服务仅作为请求转发的中介,并不对目标网站的内容或服务负责。</p> <h3>隐私和数据安全</h3> <p>保护您的个人隐私和数据安全至关重要。请不要通过本服务发送任何敏感或个人身份信息,除非您已经确认目标网站具有足够的安全措施。</p> <h3>版权和知识产权</h3> <p>您应确保在使用本服务转发内容时,不侵犯任何第三方的版权或知识产权。对于因违反版权或知识产权法律而导致的任何争议或法律责任,您应自行承担。</p> <h3>服务限制</h3> <p>本服务有可能会限制请求的数量、频率或大小。请合理使用服务,避免对服务或目标网站造成不必要的负担。</p> <h3>免责声明</h3> <p>本服务提供“按原样”的转发服务,不提供任何形式的保证。我们不对通过本服务转发的内容的准确性、可靠性或质量负责,也不对因使用本服务而可能遭受的任何损失或损害承担责任。</p> <h3>服务变更和中断</h3> <p>我们保留随时修改、更新或中断服务的权利,无需事先通知。我们不承担因服务变更或中断而造成的任何责任。</p> <h3>用户行为</h3> <p>您应确保在使用服务时遵守所有适用的法律和规定,不进行任何非法活动或恶意行为,包括但不限于网络攻击、数据爬取或任何形式的网络欺诈。</p> </section> <section> <h2>免责声明</h2> <p><strong>免责声明:</strong></p> <p>· 使用本转发服务时,您应自行承担风险。我们不保证服务的及时性、安全性、可用性或准确性。对于因使用或无法使用本服务而造成的任何直接、间接、特殊或后果性损害,我们不承担任何责任。</p> <p>· 我们不对通过本服务转发的内容承担责任,包括但不限于版权、商标或其他知识产权问题。您应确保您有权转发目标URL的内容,并且遵守所有适用的法律和规定。</p> <p>· 我们保留随时修改或中断服务的权利,无需事先通知。本服务不提供任何形式的保证或条件,无论是明示的还是暗示的。</p> <p>· 该服务不收取任何费用,使用开源代码创建,如果本服务侵犯了任何您的权利以及现有条款,我们将立刻关闭该服务。</p> </section> </div> </body> </html>`,{ headers: { 'content-type': 'text/html;charset=UTF-8', }, status: 200 // 确保状态码是200 }); }; const actualUrlStr = url.pathname.replace("/", "") + url.search + url.hash; const actualUrl = new URL(actualUrlStr); const modifiedRequest = new Request(actualUrl, { headers: request.headers, method: request.method, body: request.body, redirect: 'follow' }); handleSpecialCases(modifiedRequest); const response = await fetch(modifiedRequest); const modifiedResponse = new Response(response.body, response); modifiedResponse.headers.set('Access-Control-Allow-Origin', '*'); return modifiedResponse; } 我这里以反代OneDrive为例,然后点击右边的【部署】即可完成反代。 绑定自己域名 .workers.dev域名处于被墙状态,你可以绑定你自己的域名,但是你的域名必须交给CF托管。 然后此域名会自动解析绑定,就可以通过你自己的域名访问了。
 -
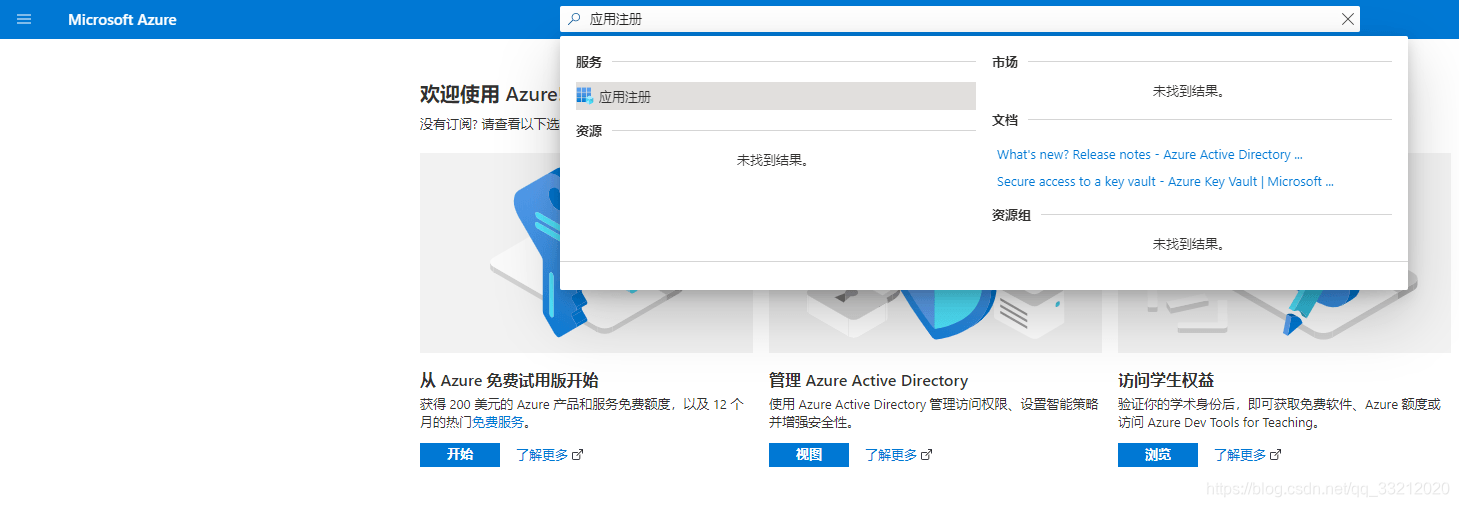
 搭建MS365 E5 Renew X调用API续订E5服务 搭建MS365 E5 Renew X调用API续订E5服务 使用Docker搭建 按照中文提示补充完整 docker run -d -p 1066:1066 -e TZ=Asia/Shanghai -e sender="发送邮件的邮箱" -e pwd="发送邮箱的授权码" -e receiver="接收邮件的邮箱" -e adminpwd="web界面的登录密码" hanhongyong/ms365-e5-renew-x:pubemail 搭建成功后输入ip:1066进行访问。 注册Azure应用程序 应用注册 点击登录 Azure或点击直接进入Azure应用注册,登录账号使用申请到的Microsoft 365 E5的管理员账户(账户名类似XXXX@YYYY.onmicrosoft.com格式)。2.登录完成后点击右上角的【门户】 按钮进入Azure管理中心,在搜索栏内输入【应用注册】,点击进入(若应用注册搜索不到请点击此处直接进入)。3.单击【新注册】按钮4.配置应用 应用名称随意写、注意可访问性选项选择最后一项、重定向URL暂时不填 、完成后点击注册 配置应用重定向URL(身份验证) 先点击【概述】,然后点击【添加重定向URL】,进入重定向URL配置界面,下图中的【应用程序(客户端)ID】即为【客户端ID】 。点击【添加平台】,再点击【移动和桌面应用程序】,继续勾选中第一个URL,最后点击底部的“配置”,该URL为【https://login.microsoftonline.com/common/oauth2/nativeclient】也可手动添加。配置默认客户端类型将应用程序视为公共客户端 点击切换按钮为【是】 ,最后点击【保存】 按钮保存。 配置应用程序的API权限(重要) 手动配置应用程序权限(非用户登录)API权限 点击【API权限】-【添加权限】-【Microsoft Graph】选择【应用程序权限】根据编辑页面中列出的API权限需求表(注意在程序中切换为"非登录“)来勾选所对应的API权限,全部选择完成后点击【添加权限】。 Calendars.Read Contacts.Read Directory.Read.All Files.Read.All Files.ReadWrite.All Mail.Read;Mail.Send MailboxSettings.Read Notes.Read.All Sites.Read.All User.Read.All 如果没有【代表XXX授予管理员同意】按钮 说明该账号不是管理员账号 换登管理员账号创建应用最后点击代表XXX授予管理员同意,对话框选择【是】(该图包含了当前程序“应用程序权限(非用户登录)”全部API所需要的权限)。 创建客户端密码 点击【证书密码】-【新客户端密码】-【24个月】-【添加】点击【值】中的【复制】,并立即将该密码保存至电脑,保存的值即为【客户端密码】 , 注:该值必须立即保存,退出该页面后将永远无法查看。 将账号API调用托管至服务 添加一个E5账户的运行配置信息 在成功登录系统后,页面会自动跳转到【主页】页面,在【账户详情】页面点击【添加运行账号】按钮,前往【账户运行配置】页面 在账户运行配置页面中填写账户信息,只要填1、2、3即可,4不选中。由于前后台数据同步需要时间,任何添加账户或者修改账户配置信息的操作都不会立即被后台执行。 返回用户页面查看账户信息中的“配置同步状态”,如果显示为“正在运行”表明配置已经上传至后台,修改账户配置成功。警示:配置成功了也要定期来看看自己的账户是否在正常运行(虽然有邮件通知服务),但也建议每月查看一次账户状态!!!
 -
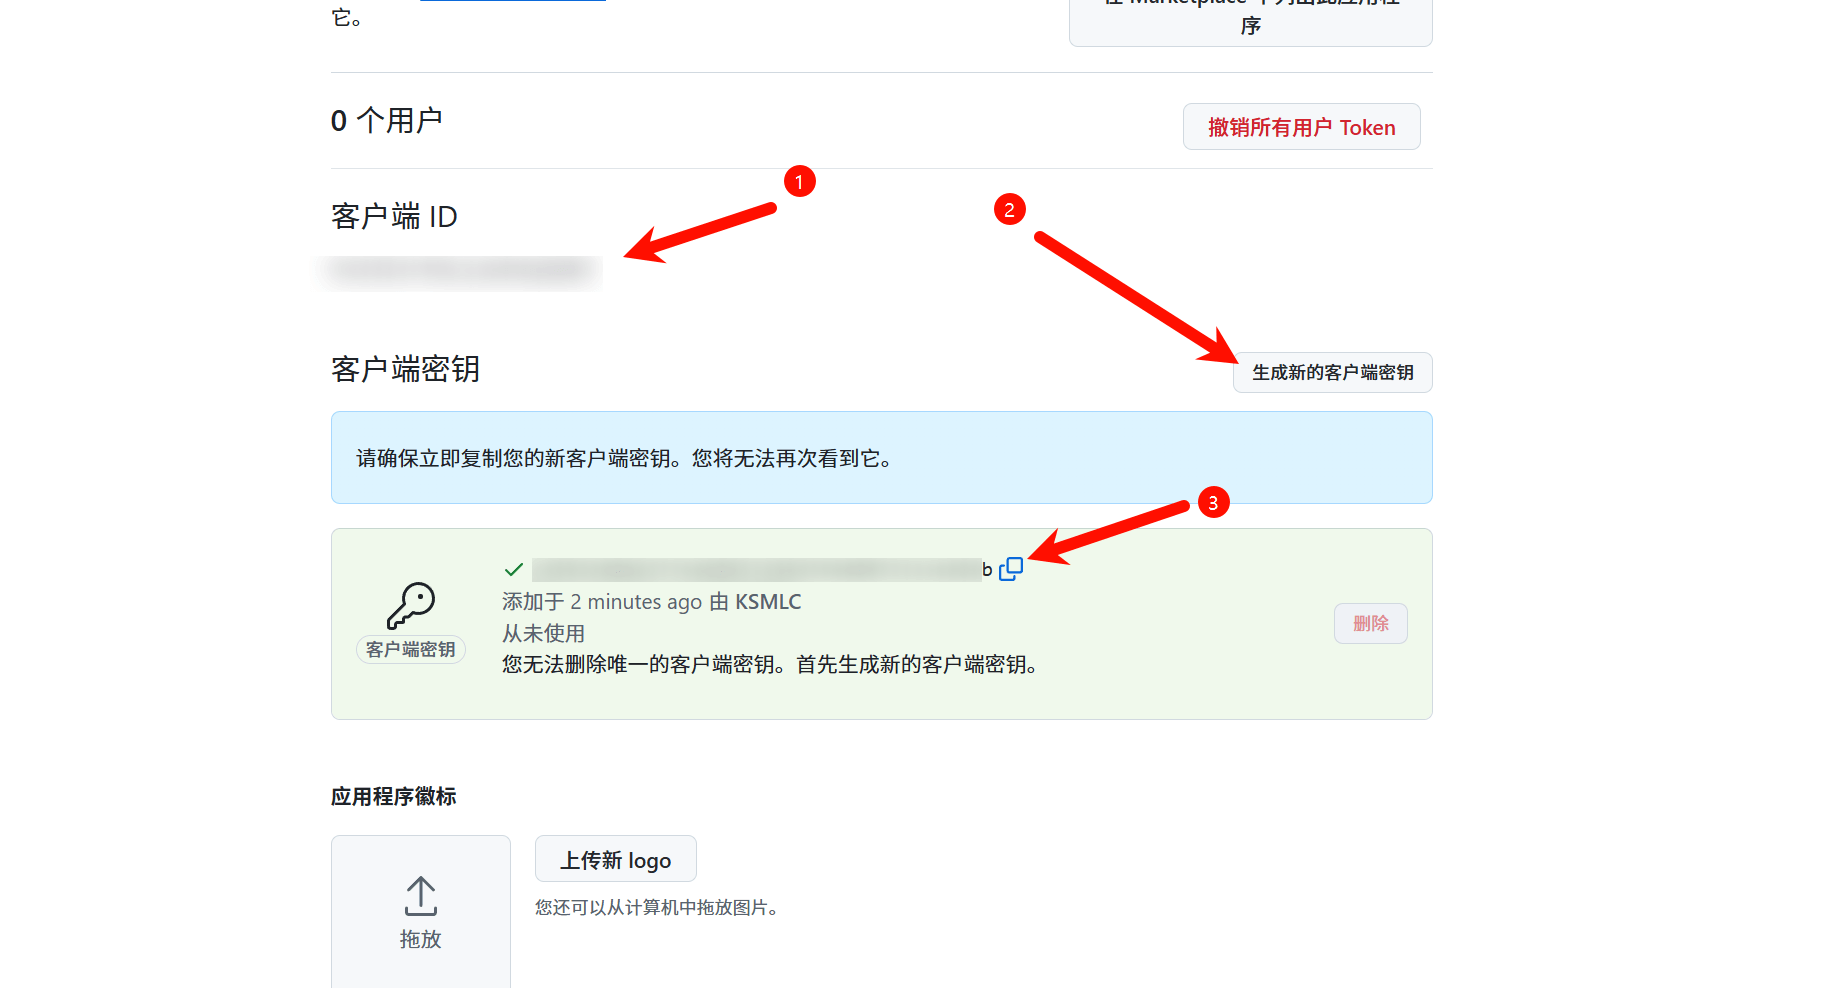
 哪吒监控部署安装教程 哪吒监控部署安装教程 官方文档:安装 Dashboard | 哪吒服务器监控 获取 Github 的 Client ID 和密钥 首先我们需要新建一个验证应用,以 Github 为例,登录 Github 后,打开 https://github.com/settings/developers ,依次选择“OAuth Apps” - “New OAuth App”。Application name - 随意填写。Homepage URL - 填写面板的访问域名或IP。Authorization callback URL - 填写回调地址,如:"https://你的域名或IP/oauth2/callback"(不要忘记/oauth2/callback)。 点击 “Register application”。 保存页面中的 Client ID,然后点击 “生成新的客户端密钥“,创建一个新的 Client Secret,新建的密钥仅会显示一次,请妥善保存。 安装面板管理 在服务器中,运行安装脚本: curl -L https://raw.githubusercontent.com/nezhahq/scripts/main/install.sh -o nezha.sh && chmod +x nezha.sh && sudo ./nezha.sh 如果你的面板服务器位于中国大陆,可以使用镜像: curl -L https://gitee.com/naibahq/scripts/raw/main/install.sh -o nezha.sh && chmod +x nezha.sh && sudo CN=true ./nezha.sh 等待 Docker 安装完毕后,分别输入以下值: OAuth提供商 - github、cloudflare、gitlab、gitee 中选择一个。 Client ID - 之前保存的 Client ID。 Client Secret - 之前保存的 Client Secret。 用户名 - OAuth 提供商中的用户名/User ID。 站点标题 - 自定义站点标题。 访问端口 - 公开访问端口,可自定义,默认 8008。 Agent的通信端口 - Agent 与 Dashboard 的通信端口,默认 5555。 输入完成后,等待拉取镜像。安装结束后,如果一切正常,此时你可以访问IP+端口号,来查看面板。 将来如果需要再次运行脚本,可以运行./nezha.sh来打开管理脚本。 反向代理(如果你只要IP访问可以省略) 如果是宝塔面板请新建一个网站并绑定域名进行反向代理,这个域名就是Github上你填入的域名,反代的地址就是IP+端口号。 添加服务器进行监控 通过IP+端口号访问进入到前台,然后点击右上角的登录(使用Github登录), 然后进入后台,点击添加服务器 然后填服务器信息,名称随便填,其他留空也可以。 然后就可以看到添加的服务器了 然后复制 一键安装脚本 到服务器进行执行 然后就可以访问前台进行查看了 成品
 -
 Collabora Online搭建教程 Collabora Online搭建教程 Collabora Online 是一款强大的在线办公套件,支持多种文档、表格、演示文稿等文件格式的在线查看、编辑、实时协作,且能与多种云解决方案集成,可在多种操作系统的浏览器上运行,保障数据安全与隐私。 安装 使用 Docker 部署 Collabora Online(官方文档): docker pull collabora/code docker run -t -d -p 127.0.0.1:9980:9980 \ -e "aliasgroup1=<允许使用此服务的 Cloudreve 地址,包含明确端口>" \ -e "username=<面板管理员用户名>" \ -e "password=<面板管理员密码>" \ --name code --restart always collabora/code 启动成功后开始设置反代 宝塔设置Nginx反代 新建一个站点并绑定域名,并成功申请SSL证书。 然后点击配置文件,将下方Nginx反代代码粘贴到server{}中。 # static files location ^~ /browser { proxy_pass https://127.0.0.1:9980; proxy_set_header Host $http_host; } # WOPI discovery URL location ^~ /hosting/discovery { proxy_pass https://127.0.0.1:9980; proxy_set_header Host $http_host; } # Capabilities location ^~ /hosting/capabilities { proxy_pass https://127.0.0.1:9980; proxy_set_header Host $http_host; } # main websocket location ~ ^/cool/(.*)/ws$ { proxy_pass https://127.0.0.1:9980; proxy_set_header Upgrade $http_upgrade; proxy_set_header Connection "Upgrade"; proxy_set_header Host $http_host; proxy_read_timeout 36000s; } # download, presentation and image upload location ~ ^/(c|l)ool { proxy_pass https://127.0.0.1:9980; proxy_set_header Host $http_host; } # Admin Console websocket location ^~ /cool/adminws { proxy_pass https://127.0.0.1:9980; proxy_set_header Upgrade $http_upgrade; proxy_set_header Connection "Upgrade"; proxy_set_header Host $http_host; proxy_read_timeout 36000s; } 查看 XML 响应 https://你的域名/hosting/discovery
 -
 宝塔搭建alist教程 宝塔搭建alist教程 alist.nn.ci/zh/guide/install/ 一键脚本 仅适用于 Linux amd64/arm64 平台。 安装 curl -fsSL "https://alist.nn.ci/v3.sh" | bash -s install 更新 curl -fsSL "https://alist.nn.ci/v3.sh" | bash -s update 卸载 curl -fsSL "https://alist.nn.ci/v3.sh" | bash -s uninstall 自定义路径 默认安装在 /opt/alist 中。 自定义安装路径,将安装路径作为第二个参数添加,必须是绝对路径(如果路径以 alist 结尾,则直接安装到给定路径,否则会安装在给定路径 alist 目录下),如 安装到 /root: # 安装 curl -fsSL "https://alist.nn.ci/v3.sh" | bash -s install /root # 更新 curl -fsSL "https://alist.nn.ci/v3.sh" | bash -s update /root # 卸载 curl -fsSL "https://alist.nn.ci/v3.sh" | bash -s uninstall /root 启动: systemctl start alist 关闭: systemctl stop alist 状态: systemctl status alist 重启: systemctl restart alist 获取密码 需要进入脚本安装AList的目录文件夹內执行如下命令 低于v3.25.0版本 ./alist admin 高于v3.25.0版本 3.25.0以上版本将密码改成加密方式存储的hash值,无法直接反算出密码,如果忘记了密码只能通过重新 随机生成 或者 手动设置 # 随机生成一个密码 ./alist admin random # 手动设置一个密码,`NEW_PASSWORD`是指你需要设置的密码 ./alist admin set NEW_PASSWORD 使用 Docker安装 发行版本 docker-cli docker run -d --restart=unless-stopped -v /etc/alist:/opt/alist/data -p 5244:5244 -e PUID=0 -e PGID=0 -e UMASK=022 --name="alist" xhofe/alist:latest docker-compose version: '3.3' services: alist: image: 'xhofe/alist:latest' container_name: alist volumes: - '/etc/alist:/opt/alist/data' ports: - '5244:5244' environment: - PUID=0 - PGID=0 - UMASK=022 restart: unless-stopped 服务运行之后,容器默认的时区为UTC时区,如果你想指定容器运行的时区,则可以通过传递此变量来实现:-e "TZ=Asia/Shanghai"。 守护进程 使用任意方式编辑 /usr/lib/systemd/system/alist.service 并添加如下内容,其中 path_alist 为 AList 所在的路径 [Unit] Description=alist After=network.target [Service] Type=simple WorkingDirectory=path_alist ExecStart=path_alist/alist server Restart=on-failure [Install] WantedBy=multi-user.target 然后,执行 systemctl daemon-reload 重载配置,现在你可以使用这些命令来管理程序: 启动: systemctl start alist 关闭: systemctl stop alist 配置开机自启: systemctl enable alist 取消开机自启: systemctl disable alist 状态: systemctl status alist 重启: systemctl restart alist Alist美化 Alist美化代码-KS-MLC|博客 (ksmlc.cn)


