玩客云刷机教程
准备工具
下载下边文件,系统镜像下载慢请开科学上网下载。
开始
-
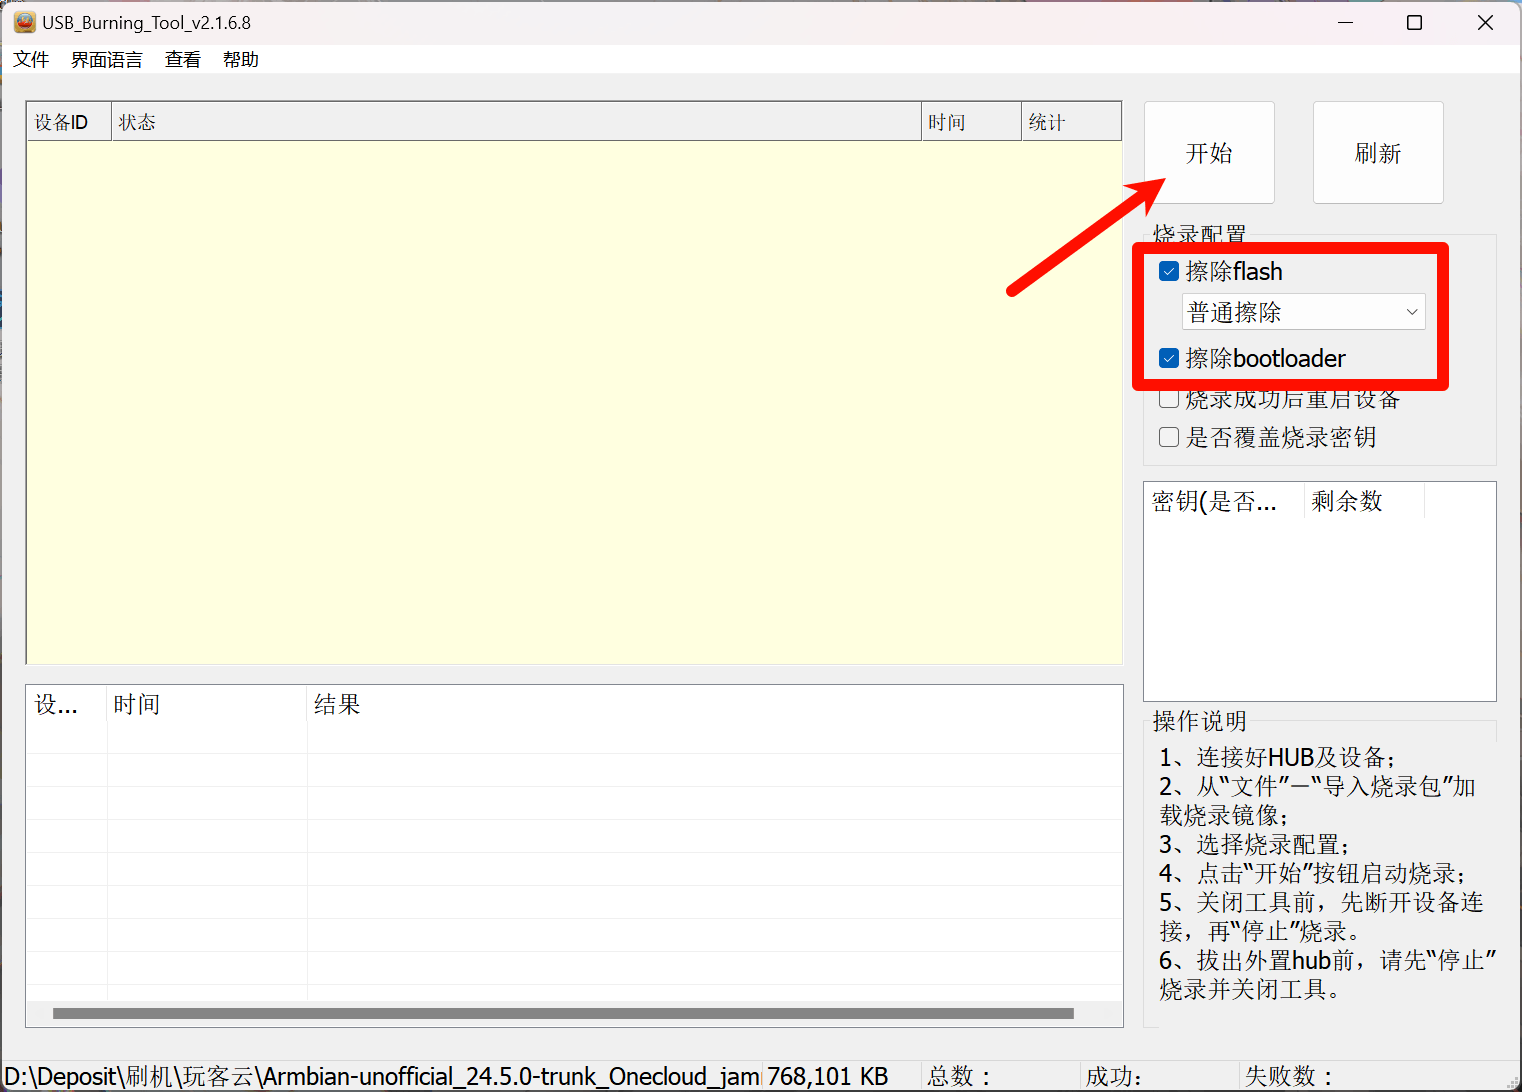
打开 USB_Burning_Tool软件,先导入刚解压完的系统镜像(左上角文件导入),然后勾选
擦除flash
(普通擦除
),直接点击开始。
-
设备先不要通电,使用双公头USB线,一头连接玩客云靠近 HDMI 口的 USB 口,另一头插电脑。
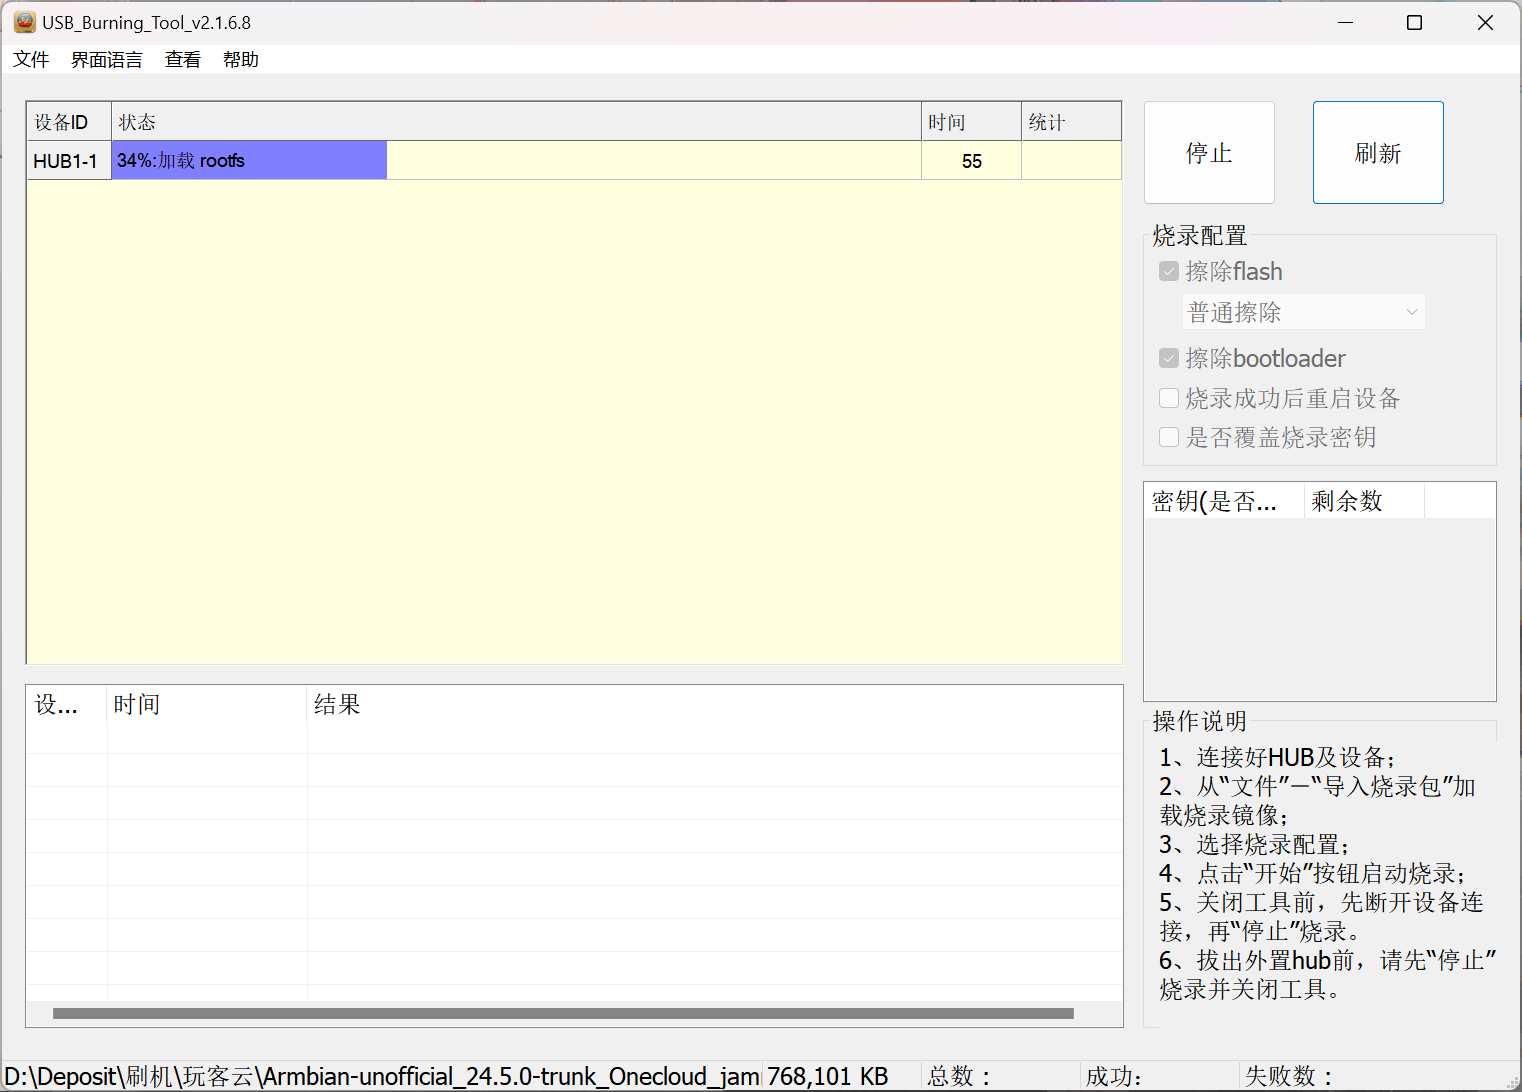
-
用
卡针
长按复位键
的同时,并接通设备电源。听到电脑发出类似插入U盘的声音,电脑烧录软件会出现烧录进度,此时复位键不要松开,再按个几秒再松开。
-
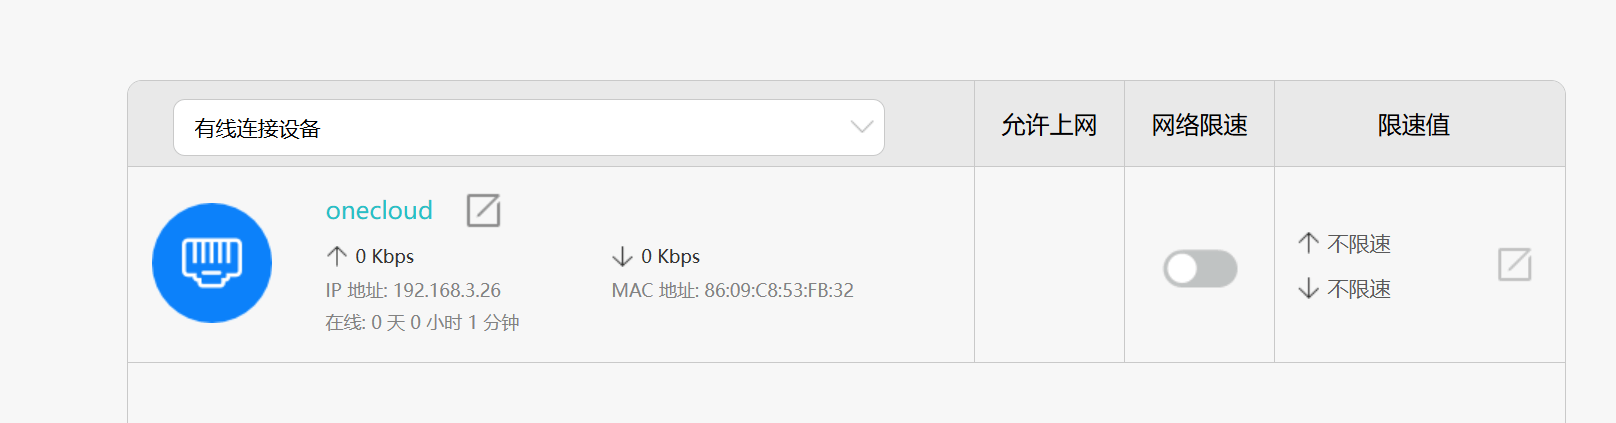
完成之后,关闭软件,断开电源,断开USB。,最后通过路由器后台查看,名称为
onecloud
的新设备接入网络,刷机成功!
-
使用SSH客户端登录玩客云,我这里用的是
XTerminal
。初始用户名为:root
,密码为:1234
。 -
登录后会提示修改密码。改完密码,提示创建用户,我们直接按
Ctrl+C
取消。
更改时区
cp /usr/share/zoneinfo/Asia/Shanghai /etc/localtime
# 验证时区是否正确
date -R
更换国内源
bash <(curl -sSL https://linuxmirrors.cn/main.sh)
固定IP
打开 /etc/network/
文件夹下的 interfaces
文件,作如下修改:
allow-hotplug eth0
iface eth0 inet static
address 192.168.3.30
netmask 255.255.255.0
gateway 192.168.3.1
然后重启网络服务:sudo systemctl restart networking
Shell脚本监控CPU温度与频率
通过调整CPU温度与频率防止死机
在/root/
下新建一个cpu-control.sh
文件,内容如下:
#!/bin/sh
# 进入一个无限循环,持续监控CPU温度和频率调节器
while true
do
# 从系统文件中读取当前CPU温度和当前的频率调节器
# /sys/class/thermal/thermal_zone0/temp 文件包含当前CPU温度(以毫摄氏度为单位)
# /sys/devices/system/cpu/cpu0/cpufreq/scaling_governor 文件包含当前CPU频率调节器
set -- $(cat /sys/class/thermal/thermal_zone0/temp \
/sys/devices/system/cpu/cpu0/cpufreq/scaling_governor)
# 将读取到的温度赋值给变量 TEMP
TEMP=$1
# 将读取到的频率调节器赋值给变量 GOVERNOR
GOVERNOR=$2
# 如果温度小于等于42摄氏度,并且当前频率调节器是"ondemand"模式
if [ "$TEMP" -le 42000 ] && [ "$GOVERNOR" = "ondemand" ]; then
# 设置CPU的最小频率为400MHz,最大频率为1200MHz
cpufreq-set -d 400m -u 1200m
fi
# 如果温度大于等于45摄氏度,并且当前频率调节器是"ondemand"模式
if [ "$TEMP" -ge 45000 ] && [ "$GOVERNOR" = "ondemand" ]; then
# 设置CPU的最小频率为400MHz,最大频率为600MHz
cpufreq-set -d 400m -u 600m
fi
# 等待5秒后再次检查温度和频率调节器
sleep 5
done
保存好,然后给文件加权限:chmod +x /root/cpu-control.sh
创建 Systemd 服务文件让其开机自启动:sudo nano /etc/systemd/system/cpu-control.service
在文件中添加以下内容:
[Unit]
Description=CPU Frequency Control Service
After=network.target
[Service]
ExecStart=/root/cpu-control.sh
Restart=always
User=root
[Install]
WantedBy=multi-user.target
重新加载 Systemd 配置:sudo systemctl daemon-reload
启用服务,使其在系统启动时自动运行:sudo systemctl enable cpu-control.service
立即启动服务(无需重启系统):sudo systemctl start cpu-control.service
安装aria2
wget -N f.ksmlc.us.kg/https://git.io/aria2.sh && chmod +x aria2.sh
如果后续的aria2.sh
执行安装失败请使用下边代码替换掉aria2.sh
的代码:
#!/usr/bin/env bash
#
# Copyright (c) 2017 Toyo
# Copyright (c) 2018-2020 P3TERX <https://p3terx.com>
#
# This is free software, licensed under the MIT License.
# See /LICENSE for more information.
#
# https://github.com/P3TERX/aria2.sh
# Description: Aria2 One-click installation management script
# System Required: CentOS/Debian/Ubuntu
# Version: 2.7.4
#
sh_ver="2.7.4"
export PATH=~/bin:/usr/local/bin:/usr/local/sbin:/usr/bin:/usr/sbin:/sbin:/bin
aria2_conf_dir="/root/.aria2c"
download_path="/root/downloads"
aria2_conf="${aria2_conf_dir}/aria2.conf"
aria2_log="${aria2_conf_dir}/aria2.log"
aria2c="/usr/local/bin/aria2c"
Crontab_file="/usr/bin/crontab"
Green_font_prefix="\033[32m"
Red_font_prefix="\033[31m"
Green_background_prefix="\033[42;37m"
Red_background_prefix="\033[41;37m"
Font_color_suffix="\033[0m"
Info="[${Green_font_prefix}信息${Font_color_suffix}]"
Error="[${Red_font_prefix}错误${Font_color_suffix}]"
Tip="[${Green_font_prefix}注意${Font_color_suffix}]"
check_root() {
[[ $EUID != 0 ]] && echo -e "${Error} 当前非ROOT账号(或没有ROOT权限),无法继续操作,请更换ROOT账号或使用 ${Green_background_prefix}sudo su${Font_color_suffix} 命令获取临时ROOT权限(执行后可能会提示输入当前账号的密码)。" && exit 1
}
#检查系统
check_sys() {
if [[ -f /etc/redhat-release ]]; then
release="centos"
elif cat /etc/issue | grep -q -E -i "debian"; then
release="debian"
elif cat /etc/issue | grep -q -E -i "ubuntu"; then
release="ubuntu"
elif cat /etc/issue | grep -q -E -i "centos|red hat|redhat"; then
release="centos"
elif cat /proc/version | grep -q -E -i "debian"; then
release="debian"
elif cat /proc/version | grep -q -E -i "ubuntu"; then
release="ubuntu"
elif cat /proc/version | grep -q -E -i "centos|red hat|redhat"; then
release="centos"
fi
ARCH=$(uname -m)
[ $(command -v dpkg) ] && dpkgARCH=$(dpkg --print-architecture | awk -F- '{ print $NF }')
}
check_installed_status() {
[[ ! -e ${aria2c} ]] && echo -e "${Error} Aria2 没有安装,请检查 !" && exit 1
[[ ! -e ${aria2_conf} ]] && echo -e "${Error} Aria2 配置文件不存在,请检查 !" && [[ $1 != "un" ]] && exit 1
}
check_crontab_installed_status() {
if [[ ! -e ${Crontab_file} ]]; then
echo -e "${Error} Crontab 没有安装,开始安装..."
if [[ ${release} == "centos" ]]; then
yum install crond -y
else
apt-get install cron -y
fi
if [[ ! -e ${Crontab_file} ]]; then
echo -e "${Error} Crontab 安装失败,请检查!" && exit 1
else
echo -e "${Info} Crontab 安装成功!"
fi
fi
}
check_pid() {
PID=$(ps -ef | grep "aria2c" | grep -v grep | grep -v "aria2.sh" | grep -v "init.d" | grep -v "service" | awk '{print $2}')
}
check_new_ver() {
aria2_new_ver=$(
{
wget -t2 -T3 -qO- "https://api.github.com/repos/P3TERX/Aria2-Pro-Core/releases/latest" ||
wget -t2 -T3 -qO- "https://gh-api.p3terx.com/repos/P3TERX/Aria2-Pro-Core/releases/latest"
} | grep -o '"tag_name": ".*"' | head -n 1 | cut -d'"' -f4
)
if [[ -z ${aria2_new_ver} ]]; then
echo -e "${Error} Aria2 最新版本获取失败,请手动获取最新版本号[ https://github.com/P3TERX/Aria2-Pro-Core/releases ]"
read -e -p "请输入版本号:" aria2_new_ver
[[ -z "${aria2_new_ver}" ]] && echo "取消..." && exit 1
fi
}
check_ver_comparison() {
read -e -p "是否更新(会中断当前下载任务) ? [Y/n] :" yn
[[ -z "${yn}" ]] && yn="y"
if [[ $yn == [Yy] ]]; then
check_pid
[[ ! -z $PID ]] && kill -9 ${PID}
check_sys
Download_aria2 "update"
Start_aria2
fi
}
Download_aria2() {
update_dl=$1
if [[ $ARCH == i*86 || $dpkgARCH == i*86 ]]; then
ARCH="i386"
elif [[ $ARCH == "x86_64" || $dpkgARCH == "amd64" ]]; then
ARCH="amd64"
elif [[ $ARCH == "aarch64" || $dpkgARCH == "arm64" ]]; then
ARCH="arm64"
elif [[ $ARCH == "armv7l" || $dpkgARCH == "armhf" ]]; then
ARCH="armhf"
else
echo -e "${Error} 不支持此 CPU 架构。"
exit 1
fi
while [[ $(which aria2c) ]]; do
echo -e "${Info} 删除旧版 Aria2 二进制文件..."
rm -vf $(which aria2c)
done
DOWNLOAD_URL="https://f.ksmlc.us.kg/https://github.com/P3TERX/Aria2-Pro-Core/releases/download/${aria2_new_ver}/aria2-${aria2_new_ver%_*}-static-linux-${ARCH}.tar.gz"
{
wget -t2 -T3 -O- "${DOWNLOAD_URL}" ||
wget -t2 -T3 -O- "https://f.ksmlc.us.kg/https://gh-acc.p3terx.com/${DOWNLOAD_URL}"
} | tar -zx
[[ ! -s "aria2c" ]] && echo -e "${Error} Aria2 下载失败 !" && exit 1
[[ ${update_dl} = "update" ]] && rm -f "${aria2c}"
mv -f aria2c "${aria2c}"
[[ ! -e ${aria2c} ]] && echo -e "${Error} Aria2 主程序安装失败!" && exit 1
chmod +x ${aria2c}
echo -e "${Info} Aria2 主程序安装完成!"
}
Download_aria2_conf() {
PROFILE_URL1="https://f.ksmlc.us.kg/https://p3terx.github.io/aria2.conf"
PROFILE_URL2="https://f.ksmlc.us.kg/https://aria2c.now.sh"
PROFILE_URL3="https://f.ksmlc.us.kg/https://cdn.jsdelivr.net/gh/P3TERX/aria2.conf@master"
PROFILE_LIST="
aria2.conf
clean.sh
core
script.conf
rclone.env
upload.sh
delete.sh
dht.dat
dht6.dat
move.sh
LICENSE
"
mkdir -p "${aria2_conf_dir}" && cd "${aria2_conf_dir}"
for PROFILE in ${PROFILE_LIST}; do
[[ ! -f ${PROFILE} ]] && rm -rf ${PROFILE}
wget -N -t2 -T3 ${PROFILE_URL1}/${PROFILE} ||
wget -N -t2 -T3 ${PROFILE_URL2}/${PROFILE} ||
wget -N -t2 -T3 ${PROFILE_URL3}/${PROFILE}
[[ ! -s ${PROFILE} ]] && {
echo -e "${Error} '${PROFILE}' 下载失败!清理残留文件..."
rm -vrf "${aria2_conf_dir}"
exit 1
}
done
sed -i "s@^\(dir=\).*@\1${download_path}@" ${aria2_conf}
sed -i "s@/root/.aria2/@${aria2_conf_dir}/@" ${aria2_conf_dir}/*.conf
sed -i "s@^\(rpc-secret=\).*@\1$(date +%s%N | md5sum | head -c 20)@" ${aria2_conf}
sed -i "s@^#\(retry-on-.*=\).*@\1true@" ${aria2_conf}
sed -i "s@^\(max-connection-per-server=\).*@\132@" ${aria2_conf}
touch aria2.session
chmod +x *.sh
echo -e "${Info} Aria2 完美配置下载完成!"
}
Service_aria2() {
if [[ ${release} = "centos" ]]; then
wget -N -t2 -T3 "https://f.ksmlc.us.kg/https://raw.githubusercontent.com/P3TERX/aria2.sh/master/service/aria2_centos" -O /etc/init.d/aria2 ||
wget -N -t2 -T3 "https://f.ksmlc.us.kg/https://cdn.jsdelivr.net/gh/P3TERX/aria2.sh@master/service/aria2_centos" -O /etc/init.d/aria2 ||
wget -N -t2 -T3 "https://f.ksmlc.us.kg/https://gh-raw.p3terx.com/P3TERX/aria2.sh/master/service/aria2_centos" -O /etc/init.d/aria2
[[ ! -s /etc/init.d/aria2 ]] && {
echo -e "${Error} Aria2服务 管理脚本下载失败 !"
exit 1
}
chmod +x /etc/init.d/aria2
chkconfig --add aria2
chkconfig aria2 on
else
wget -N -t2 -T3 "https://f.ksmlc.us.kg/https://raw.githubusercontent.com/P3TERX/aria2.sh/master/service/aria2_debian" -O /etc/init.d/aria2 ||
wget -N -t2 -T3 "https://f.ksmlc.us.kg/https://cdn.jsdelivr.net/gh/P3TERX/aria2.sh@master/service/aria2_debian" -O /etc/init.d/aria2 ||
wget -N -t2 -T3 "https://f.ksmlc.us.kg/https://gh-raw.p3terx.com/P3TERX/aria2.sh/master/service/aria2_debian" -O /etc/init.d/aria2
[[ ! -s /etc/init.d/aria2 ]] && {
echo -e "${Error} Aria2服务 管理脚本下载失败 !"
exit 1
}
chmod +x /etc/init.d/aria2
update-rc.d -f aria2 defaults
fi
echo -e "${Info} Aria2服务 管理脚本下载完成 !"
}
Installation_dependency() {
if [[ ${release} = "centos" ]]; then
yum update
yum install -y wget curl nano ca-certificates findutils jq tar gzip dpkg
else
apt-get update
apt-get install -y wget curl nano ca-certificates findutils jq tar gzip dpkg
fi
if [[ ! -s /etc/ssl/certs/ca-certificates.crt ]]; then
wget -qO- git.io/ca-certificates.sh | bash
fi
}
Install_aria2() {
check_root
[[ -e ${aria2c} ]] && echo -e "${Error} Aria2 已安装,请检查 !" && exit 1
check_sys
echo -e "${Info} 开始安装/配置 依赖..."
Installation_dependency
echo -e "${Info} 开始下载/安装 主程序..."
check_new_ver
Download_aria2
echo -e "${Info} 开始下载/安装 Aria2 完美配置..."
Download_aria2_conf
echo -e "${Info} 开始下载/安装 服务脚本(init)..."
Service_aria2
Read_config
aria2_RPC_port=${aria2_port}
echo -e "${Info} 开始设置 iptables 防火墙..."
Set_iptables
echo -e "${Info} 开始添加 iptables 防火墙规则..."
Add_iptables
echo -e "${Info} 开始保存 iptables 防火墙规则..."
Save_iptables
echo -e "${Info} 开始创建 下载目录..."
mkdir -p ${download_path}
echo -e "${Info} 所有步骤 安装完毕,开始启动..."
Start_aria2
}
Start_aria2() {
check_installed_status
check_pid
[[ ! -z ${PID} ]] && echo -e "${Error} Aria2 正在运行,请检查 !" && exit 1
/etc/init.d/aria2 start
}
Stop_aria2() {
check_installed_status
check_pid
[[ -z ${PID} ]] && echo -e "${Error} Aria2 没有运行,请检查 !" && exit 1
/etc/init.d/aria2 stop
}
Restart_aria2() {
check_installed_status
check_pid
[[ ! -z ${PID} ]] && /etc/init.d/aria2 stop
/etc/init.d/aria2 start
}
Set_aria2() {
check_installed_status
echo -e "
${Green_font_prefix}1.${Font_color_suffix} 修改 Aria2 RPC 密钥
${Green_font_prefix}2.${Font_color_suffix} 修改 Aria2 RPC 端口
${Green_font_prefix}3.${Font_color_suffix} 修改 Aria2 下载目录
${Green_font_prefix}4.${Font_color_suffix} 修改 Aria2 密钥 + 端口 + 下载目录
${Green_font_prefix}5.${Font_color_suffix} 手动 打开配置文件修改
————————————
${Green_font_prefix}0.${Font_color_suffix} 重置/更新 Aria2 完美配置
"
read -e -p " 请输入数字 [0-5]:" aria2_modify
if [[ ${aria2_modify} == "1" ]]; then
Set_aria2_RPC_passwd
elif [[ ${aria2_modify} == "2" ]]; then
Set_aria2_RPC_port
elif [[ ${aria2_modify} == "3" ]]; then
Set_aria2_RPC_dir
elif [[ ${aria2_modify} == "4" ]]; then
Set_aria2_RPC_passwd_port_dir
elif [[ ${aria2_modify} == "5" ]]; then
Set_aria2_vim_conf
elif [[ ${aria2_modify} == "0" ]]; then
Reset_aria2_conf
else
echo
echo -e " ${Error} 请输入正确的数字"
exit 1
fi
}
Set_aria2_RPC_passwd() {
read_123=$1
if [[ ${read_123} != "1" ]]; then
Read_config
fi
if [[ -z "${aria2_passwd}" ]]; then
aria2_passwd_1="空(没有检测到配置,可能手动删除或注释了)"
else
aria2_passwd_1=${aria2_passwd}
fi
echo -e "
${Tip} Aria2 RPC 密钥不要包含等号(=)和井号(#),留空为随机生成。
当前 RPC 密钥为: ${Green_font_prefix}${aria2_passwd_1}${Font_color_suffix}
"
read -e -p " 请输入新的 RPC 密钥: " aria2_RPC_passwd
echo
[[ -z "${aria2_RPC_passwd}" ]] && aria2_RPC_passwd=$(date +%s%N | md5sum | head -c 20)
if [[ "${aria2_passwd}" != "${aria2_RPC_passwd}" ]]; then
if [[ -z "${aria2_passwd}" ]]; then
echo -e "\nrpc-secret=${aria2_RPC_passwd}" >>${aria2_conf}
if [[ $? -eq 0 ]]; then
echo -e "${Info} RPC 密钥修改成功!新密钥为:${Green_font_prefix}${aria2_RPC_passwd}${Font_color_suffix}(配置文件中缺少相关选项参数,已自动加入配置文件底部)"
if [[ ${read_123} != "1" ]]; then
Restart_aria2
fi
else
echo -e "${Error} RPC 密钥修改失败!旧密钥为:${Green_font_prefix}${aria2_passwd}${Font_color_suffix}"
fi
else
sed -i 's/^rpc-secret='${aria2_passwd}'/rpc-secret='${aria2_RPC_passwd}'/g' ${aria2_conf}
if [[ $? -eq 0 ]]; then
echo -e "${Info} RPC 密钥修改成功!新密钥为:${Green_font_prefix}${aria2_RPC_passwd}${Font_color_suffix}"
if [[ ${read_123} != "1" ]]; then
Restart_aria2
fi
else
echo -e "${Error} RPC 密钥修改失败!旧密钥为:${Green_font_prefix}${aria2_passwd}${Font_color_suffix}"
fi
fi
else
echo -e "${Error} 与旧配置一致,无需修改..."
fi
}
Set_aria2_RPC_port() {
read_123=$1
if [[ ${read_123} != "1" ]]; then
Read_config
fi
if [[ -z "${aria2_port}" ]]; then
aria2_port_1="空(没有检测到配置,可能手动删除或注释了)"
else
aria2_port_1=${aria2_port}
fi
echo -e "
当前 RPC 端口为: ${Green_font_prefix}${aria2_port_1}${Font_color_suffix}
"
read -e -p " 请输入新的 RPC 端口(默认: 6800): " aria2_RPC_port
echo
[[ -z "${aria2_RPC_port}" ]] && aria2_RPC_port="6800"
if [[ "${aria2_port}" != "${aria2_RPC_port}" ]]; then
if [[ -z "${aria2_port}" ]]; then
echo -e "\nrpc-listen-port=${aria2_RPC_port}" >>${aria2_conf}
if [[ $? -eq 0 ]]; then
echo -e "${Info} RPC 端口修改成功!新端口为:${Green_font_prefix}${aria2_RPC_port}${Font_color_suffix}(配置文件中缺少相关选项参数,已自动加入配置文件底部)"
Del_iptables
Add_iptables
Save_iptables
if [[ ${read_123} != "1" ]]; then
Restart_aria2
fi
else
echo -e "${Error} RPC 端口修改失败!旧端口为:${Green_font_prefix}${aria2_port}${Font_color_suffix}"
fi
else
sed -i 's/^rpc-listen-port='${aria2_port}'/rpc-listen-port='${aria2_RPC_port}'/g' ${aria2_conf}
if [[ $? -eq 0 ]]; then
echo -e "${Info} RPC 端口修改成功!新端口为:${Green_font_prefix}${aria2_RPC_port}${Font_color_suffix}"
Del_iptables
Add_iptables
Save_iptables
if [[ ${read_123} != "1" ]]; then
Restart_aria2
fi
else
echo -e "${Error} RPC 端口修改失败!旧端口为:${Green_font_prefix}${aria2_port}${Font_color_suffix}"
fi
fi
else
echo -e "${Error} 与旧配置一致,无需修改..."
fi
}
Set_aria2_RPC_dir() {
read_123=$1
if [[ ${read_123} != "1" ]]; then
Read_config
fi
if [[ -z "${aria2_dir}" ]]; then
aria2_dir_1="空(没有检测到配置,可能手动删除或注释了)"
else
aria2_dir_1=${aria2_dir}
fi
echo -e "
当前下载目录为: ${Green_font_prefix}${aria2_dir_1}${Font_color_suffix}
"
read -e -p " 请输入新的下载目录(默认: ${download_path}): " aria2_RPC_dir
[[ -z "${aria2_RPC_dir}" ]] && aria2_RPC_dir="${download_path}"
mkdir -p ${aria2_RPC_dir}
echo
if [[ "${aria2_dir}" != "${aria2_RPC_dir}" ]]; then
if [[ -z "${aria2_dir}" ]]; then
echo -e "\ndir=${aria2_RPC_dir}" >>${aria2_conf}
if [[ $? -eq 0 ]]; then
echo -e "${Info} 下载目录修改成功!新位置为:${Green_font_prefix}${aria2_RPC_dir}${Font_color_suffix}(配置文件中缺少相关选项参数,已自动加入配置文件底部)"
if [[ ${read_123} != "1" ]]; then
Restart_aria2
fi
else
echo -e "${Error} 下载目录修改失败!旧位置为:${Green_font_prefix}${aria2_dir}${Font_color_suffix}"
fi
else
aria2_dir_2=$(echo "${aria2_dir}" | sed 's/\//\\\//g')
aria2_RPC_dir_2=$(echo "${aria2_RPC_dir}" | sed 's/\//\\\//g')
sed -i "s@^\(dir=\).*@\1${aria2_RPC_dir_2}@" ${aria2_conf}
sed -i "s@^\(DOWNLOAD_PATH='\).*@\1${aria2_RPC_dir_2}'@" ${aria2_conf_dir}/*.sh
if [[ $? -eq 0 ]]; then
echo -e "${Info} 下载目录修改成功!新位置为:${Green_font_prefix}${aria2_RPC_dir}${Font_color_suffix}"
if [[ ${read_123} != "1" ]]; then
Restart_aria2
fi
else
echo -e "${Error} 下载目录修改失败!旧位置为:${Green_font_prefix}${aria2_dir}${Font_color_suffix}"
fi
fi
else
echo -e "${Error} 与旧配置一致,无需修改..."
fi
}
Set_aria2_RPC_passwd_port_dir() {
Read_config
Set_aria2_RPC_passwd "1"
Set_aria2_RPC_port "1"
Set_aria2_RPC_dir "1"
Restart_aria2
}
Set_aria2_vim_conf() {
Read_config
aria2_port_old=${aria2_port}
aria2_dir_old=${aria2_dir}
echo -e "
配置文件位置:${Green_font_prefix}${aria2_conf}${Font_color_suffix}
${Tip} 手动修改配置文件须知:
${Green_font_prefix}1.${Font_color_suffix} 默认使用 nano 文本编辑器打开
${Green_font_prefix}2.${Font_color_suffix} 退出并保存文件:按 ${Green_font_prefix}Ctrl+X${Font_color_suffix} 组合键,输入 ${Green_font_prefix}y${Font_color_suffix} ,按 ${Green_font_prefix}Enter${Font_color_suffix} 键
${Green_font_prefix}3.${Font_color_suffix} 退出不保存文件:按 ${Green_font_prefix}Ctrl+X${Font_color_suffix} 组合键,输入 ${Green_font_prefix}n${Font_color_suffix}
${Green_font_prefix}4.${Font_color_suffix} nano 详细使用教程:${Green_font_prefix}https://p3terx.com/archives/linux-nano-tutorial.html${Font_color_suffix}
${Green_font_prefix}5.${Font_color_suffix} 配置文件有中文注释,若语言设置有问题会导致中文乱码
"
read -e -p "按任意键继续,按 Ctrl+C 组合键取消" var
nano "${aria2_conf}"
Read_config
if [[ ${aria2_port_old} != ${aria2_port} ]]; then
aria2_RPC_port=${aria2_port}
aria2_port=${aria2_port_old}
Del_iptables
Add_iptables
Save_iptables
fi
if [[ ${aria2_dir_old} != ${aria2_dir} ]]; then
mkdir -p ${aria2_dir}
aria2_dir_2=$(echo "${aria2_dir}" | sed 's/\//\\\//g')
aria2_dir_old_2=$(echo "${aria2_dir_old}" | sed 's/\//\\\//g')
sed -i "s@^\(DOWNLOAD_PATH='\).*@\1${aria2_dir_2}'@" ${aria2_conf_dir}/*.sh
fi
Restart_aria2
}
Reset_aria2_conf() {
Read_config
aria2_port_old=${aria2_port}
echo
echo -e "${Tip} 此操作将重新下载 Aria2 完美配置方案,所有已设定的配置将丢失。"
echo
read -e -p "按任意键继续,按 Ctrl+C 组合键取消" var
Download_aria2_conf
Read_config
if [[ ${aria2_port_old} != ${aria2_port} ]]; then
aria2_RPC_port=${aria2_port}
aria2_port=${aria2_port_old}
Del_iptables
Add_iptables
Save_iptables
fi
Restart_aria2
}
Read_config() {
status_type=$1
if [[ ! -e ${aria2_conf} ]]; then
if [[ ${status_type} != "un" ]]; then
echo -e "${Error} Aria2 配置文件不存在 !" && exit 1
fi
else
conf_text=$(cat ${aria2_conf} | grep -v '#')
aria2_dir=$(echo -e "${conf_text}" | grep "^dir=" | awk -F "=" '{print $NF}')
aria2_port=$(echo -e "${conf_text}" | grep "^rpc-listen-port=" | awk -F "=" '{print $NF}')
aria2_passwd=$(echo -e "${conf_text}" | grep "^rpc-secret=" | awk -F "=" '{print $NF}')
aria2_bt_port=$(echo -e "${conf_text}" | grep "^listen-port=" | awk -F "=" '{print $NF}')
aria2_dht_port=$(echo -e "${conf_text}" | grep "^dht-listen-port=" | awk -F "=" '{print $NF}')
fi
}
View_Aria2() {
check_installed_status
Read_config
IPV4=$(
wget -qO- -t1 -T2 -4 api.ip.sb/ip ||
wget -qO- -t1 -T2 -4 ifconfig.io/ip ||
wget -qO- -t1 -T2 -4 www.trackip.net/ip
)
IPV6=$(
wget -qO- -t1 -T2 -6 api.ip.sb/ip ||
wget -qO- -t1 -T2 -6 ifconfig.io/ip ||
wget -qO- -t1 -T2 -6 www.trackip.net/ip
)
[[ -z "${IPV4}" ]] && IPV4="IPv4 地址检测失败"
[[ -z "${IPV6}" ]] && IPV6="IPv6 地址检测失败"
[[ -z "${aria2_dir}" ]] && aria2_dir="找不到配置参数"
[[ -z "${aria2_port}" ]] && aria2_port="找不到配置参数"
[[ -z "${aria2_passwd}" ]] && aria2_passwd="找不到配置参数(或无密钥)"
if [[ -z "${IPV4}" || -z "${aria2_port}" ]]; then
AriaNg_URL="null"
else
AriaNg_API="/#!/settings/rpc/set/ws/${IPV4}/${aria2_port}/jsonrpc/$(echo -n ${aria2_passwd} | base64)"
AriaNg_URL="http://ariang.js.org${AriaNg_API}"
fi
clear
echo -e "\nAria2 简单配置信息:\n
IPv4 地址\t: ${Green_font_prefix}${IPV4}${Font_color_suffix}
IPv6 地址\t: ${Green_font_prefix}${IPV6}${Font_color_suffix}
RPC 端口\t: ${Green_font_prefix}${aria2_port}${Font_color_suffix}
RPC 密钥\t: ${Green_font_prefix}${aria2_passwd}${Font_color_suffix}
下载目录\t: ${Green_font_prefix}${aria2_dir}${Font_color_suffix}
AriaNg 链接\t: ${Green_font_prefix}${AriaNg_URL}${Font_color_suffix}\n"
}
View_Log() {
[[ ! -e ${aria2_log} ]] && echo -e "${Error} Aria2 日志文件不存在 !" && exit 1
echo && echo -e "${Tip} 按 ${Red_font_prefix}Ctrl+C${Font_color_suffix} 终止查看日志" && echo -e "如果需要查看完整日志内容,请用 ${Red_font_prefix}cat ${aria2_log}${Font_color_suffix} 命令。" && echo
tail -f ${aria2_log}
}
Clean_Log() {
[[ ! -e ${aria2_log} ]] && echo -e "${Error} Aria2 日志文件不存在 !" && exit 1
echo >${aria2_log}
echo -e "${Info} Aria2 日志已清空 !"
}
crontab_update_status() {
crontab -l | grep "tracker.sh"
}
Update_bt_tracker_cron() {
check_installed_status
check_crontab_installed_status
if [[ -z $(crontab_update_status) ]]; then
echo
echo -e " 是否开启 ${Green_font_prefix}自动更新 BT-Tracker${Font_color_suffix} 功能?(可能会增强 BT 下载速率)[Y/n] \c"
read -e crontab_update_status_ny
[[ -z "${crontab_update_status_ny}" ]] && crontab_update_status_ny="y"
if [[ ${crontab_update_status_ny} == [Yy] ]]; then
crontab_update_start
else
echo && echo " 已取消..."
fi
else
echo
echo -e " 是否关闭 ${Red_font_prefix}自动更新 BT-Tracker${Font_color_suffix} 功能?[y/N] \c"
read -e crontab_update_status_ny
[[ -z "${crontab_update_status_ny}" ]] && crontab_update_status_ny="n"
if [[ ${crontab_update_status_ny} == [Yy] ]]; then
crontab_update_stop
else
echo && echo " 已取消..."
fi
fi
}
crontab_update_start() {
crontab -l >"/tmp/crontab.bak"
sed -i "/aria2.sh update-bt-tracker/d" "/tmp/crontab.bak"
sed -i "/tracker.sh/d" "/tmp/crontab.bak"
echo -e "\n0 7 * * * /bin/bash <(wget -qO- git.io/tracker.sh) ${aria2_conf} RPC 2>&1 | tee ${aria2_conf_dir}/tracker.log" >>"/tmp/crontab.bak"
crontab "/tmp/crontab.bak"
rm -f "/tmp/crontab.bak"
if [[ -z $(crontab_update_status) ]]; then
echo && echo -e "${Error} 自动更新 BT-Tracker 开启失败 !" && exit 1
else
Update_bt_tracker
echo && echo -e "${Info} 自动更新 BT-Tracker 开启成功 !"
fi
}
crontab_update_stop() {
crontab -l >"/tmp/crontab.bak"
sed -i "/aria2.sh update-bt-tracker/d" "/tmp/crontab.bak"
sed -i "/tracker.sh/d" "/tmp/crontab.bak"
crontab "/tmp/crontab.bak"
rm -f "/tmp/crontab.bak"
if [[ -n $(crontab_update_status) ]]; then
echo && echo -e "${Error} 自动更新 BT-Tracker 关闭失败 !" && exit 1
else
echo && echo -e "${Info} 自动更新 BT-Tracker 关闭成功 !"
fi
}
Update_bt_tracker() {
check_installed_status
check_pid
[[ -z $PID ]] && {
bash <(wget -qO- git.io/tracker.sh) ${aria2_conf}
} || {
bash <(wget -qO- git.io/tracker.sh) ${aria2_conf} RPC
}
}
Update_aria2() {
check_installed_status
check_new_ver
check_ver_comparison
}
Uninstall_aria2() {
check_installed_status "un"
echo "确定要卸载 Aria2 ? (y/N)"
echo
read -e -p "(默认: n):" unyn
[[ -z ${unyn} ]] && unyn="n"
if [[ ${unyn} == [Yy] ]]; then
crontab -l >"/tmp/crontab.bak"
sed -i "/aria2.sh/d" "/tmp/crontab.bak"
sed -i "/tracker.sh/d" "/tmp/crontab.bak"
crontab "/tmp/crontab.bak"
rm -f "/tmp/crontab.bak"
check_pid
[[ ! -z $PID ]] && kill -9 ${PID}
Read_config "un"
Del_iptables
Save_iptables
rm -rf "${aria2c}"
rm -rf "${aria2_conf_dir}"
if [[ ${release} = "centos" ]]; then
chkconfig --del aria2
else
update-rc.d -f aria2 remove
fi
rm -rf "/etc/init.d/aria2"
echo && echo "Aria2 卸载完成 !" && echo
else
echo && echo "卸载已取消..." && echo
fi
}
Add_iptables() {
iptables -I INPUT -m state --state NEW -m tcp -p tcp --dport ${aria2_RPC_port} -j ACCEPT
iptables -I INPUT -m state --state NEW -m tcp -p tcp --dport ${aria2_bt_port} -j ACCEPT
iptables -I INPUT -m state --state NEW -m udp -p udp --dport ${aria2_dht_port} -j ACCEPT
}
Del_iptables() {
iptables -D INPUT -m state --state NEW -m tcp -p tcp --dport ${aria2_port} -j ACCEPT
iptables -D INPUT -m state --state NEW -m tcp -p tcp --dport ${aria2_bt_port} -j ACCEPT
iptables -D INPUT -m state --state NEW -m udp -p udp --dport ${aria2_dht_port} -j ACCEPT
}
Save_iptables() {
if [[ ${release} == "centos" ]]; then
service iptables save
else
iptables-save >/etc/iptables.up.rules
fi
}
Set_iptables() {
if [[ ${release} == "centos" ]]; then
service iptables save
chkconfig --level 2345 iptables on
else
iptables-save >/etc/iptables.up.rules
echo -e '#!/bin/bash\n/sbin/iptables-restore < /etc/iptables.up.rules' >/etc/network/if-pre-up.d/iptables
chmod +x /etc/network/if-pre-up.d/iptables
fi
}
Update_Shell() {
sh_new_ver=$(wget -qO- -t1 -T3 "https://raw.githubusercontent.com/P3TERX/aria2.sh/master/aria2.sh" | grep 'sh_ver="' | awk -F "=" '{print $NF}' | sed 's/\"//g' | head -1) && sh_new_type="github"
[[ -z ${sh_new_ver} ]] && echo -e "${Error} 无法链接到 Github !" && exit 0
if [[ -e "/etc/init.d/aria2" ]]; then
rm -rf /etc/init.d/aria2
Service_aria2
Restart_aria2
fi
if [[ -n $(crontab_update_status) ]]; then
crontab_update_stop
fi
wget -N "https://f.ksmlc.us.kg/https://raw.githubusercontent.com/P3TERX/aria2.sh/master/aria2.sh" && chmod +x aria2.sh
echo -e "脚本已更新为最新版本[ ${sh_new_ver} ] !(注意:因为更新方式为直接覆盖当前运行的脚本,所以可能下面会提示一些报错,无视即可)" && exit 0
}
echo && echo -e " Aria2 一键安装管理脚本 增强版 ${Red_font_prefix}[v${sh_ver}]${Font_color_suffix} by \033[1;35mP3TERX.COM\033[0m
${Green_font_prefix} 0.${Font_color_suffix} 升级脚本
———————————————————————
${Green_font_prefix} 1.${Font_color_suffix} 安装 Aria2
${Green_font_prefix} 2.${Font_color_suffix} 更新 Aria2
${Green_font_prefix} 3.${Font_color_suffix} 卸载 Aria2
———————————————————————
${Green_font_prefix} 4.${Font_color_suffix} 启动 Aria2
${Green_font_prefix} 5.${Font_color_suffix} 停止 Aria2
${Green_font_prefix} 6.${Font_color_suffix} 重启 Aria2
———————————————————————
${Green_font_prefix} 7.${Font_color_suffix} 修改 配置
${Green_font_prefix} 8.${Font_color_suffix} 查看 配置
${Green_font_prefix} 9.${Font_color_suffix} 查看 日志
${Green_font_prefix}10.${Font_color_suffix} 清空 日志
———————————————————————
${Green_font_prefix}11.${Font_color_suffix} 手动更新 BT-Tracker
${Green_font_prefix}12.${Font_color_suffix} 自动更新 BT-Tracker
———————————————————————" && echo
if [[ -e ${aria2c} ]]; then
check_pid
if [[ ! -z "${PID}" ]]; then
echo -e " Aria2 状态: ${Green_font_prefix}已安装${Font_color_suffix} | ${Green_font_prefix}已启动${Font_color_suffix}"
else
echo -e " Aria2 状态: ${Green_font_prefix}已安装${Font_color_suffix} | ${Red_font_prefix}未启动${Font_color_suffix}"
fi
if [[ -n $(crontab_update_status) ]]; then
echo
echo -e " 自动更新 BT-Tracker: ${Green_font_prefix}已开启${Font_color_suffix}"
else
echo
echo -e " 自动更新 BT-Tracker: ${Red_font_prefix}未开启${Font_color_suffix}"
fi
else
echo -e " Aria2 状态: ${Red_font_prefix}未安装${Font_color_suffix}"
fi
echo
read -e -p " 请输入数字 [0-12]:" num
case "$num" in
0)
Update_Shell
;;
1)
Install_aria2
;;
2)
Update_aria2
;;
3)
Uninstall_aria2
;;
4)
Start_aria2
;;
5)
Stop_aria2
;;
6)
Restart_aria2
;;
7)
Set_aria2
;;
8)
View_Aria2
;;
9)
View_Log
;;
10)
Clean_Log
;;
11)
Update_bt_tracker
;;
12)
Update_bt_tracker_cron
;;
*)
echo
echo -e " ${Error} 请输入正确的数字"
;;
esac
安装Docker
# 安装
apt-get install docker.io
# 检查
docker -v
安装OpenWrt
xuanaimai/onecloud – Docker Image | Docker Hub
打开网卡混杂模式:
ip link set eth0 promisc on
创建网络:
[自己根据 玩客云 所在网段修改,如:玩客云IP:
192.168.3.64
,则192.168.1.0/24
改成192.168.3.0/24
,192.168.1.1
改成主路由地址]
docker network create -d macvlan --subnet=192.168.1.0/24 --gateway=192.168.1.1 -o parent=eth0 macnet
将OpenWRT镜像文件上传到服务器,进行本地拉取 OpenWRT 镜像:
docker load -i /opt/onecloud-21-09-15.tar
创建容器:
--name=OneCloud
其中OneCloud是容器名称,可以更改成你想要的,容器名称注意不要和其他容器一样,会冲突
docker run -itd --name=OneCloud --restart=always --network=macnet --privileged=true xuanaimai/onecloud:21-09-15 /sbin/init
根据主路由 DHCP 分配里找到一个主机名叫 OpenWRT 的,复制它的IPv4 地址粘贴到浏览器就能进入 OpenWRT 了,密码是 password
安装1Panel
安装CasaOS
curl -fsSL https://get.casaos.io | sudo bash
镜像说明
Armbian系统镜像:Releases · hzyitc/armbian-onecloud (github.com)
Debian Bullseye
- 发行版: Debian
- 代号: Bullseye
- 版本: Debian 11
Debian Bookworm
- 发行版: Debian
- 代号: Bookworm
- 版本: Debian 12(开发代号)
Ubuntu Jammy
- 发行版: Ubuntu
- 代号: Jammy Jellyfish
- 版本: Ubuntu 22.04 LTS
更新版本
edge:通常指更前沿、更频繁更新的分支,可能包含最新的开发软件包。
Current:通常指当前稳定版本的最新状态。
举例
例如:Armbian-unofficial_24.5.0-trunk_Onecloud_bookworm_edge_6.7.9_burn.img
bookworm:Debian 12
edge:频繁更新
我推荐:bookworm_current的版本
暂无评论内容